Invoice overview is a list of previous invoices that can be accessed by logged in customers. This feature allows recurring or B2B customers to re-download and check invoices and previous orders.
Since the Invoice Overview feature shows invoices imported from an ERP system, it is possible to display both invoices originating from eSeller Cloud orders and invoices originating from Physical Stores.
Work Flow
- An order is generated, either in a physical store or in eSeller Cloud
- The order is Invoiced in the ERP system
- The invoice is exported to eSeller Cloud
- The invoice is available for the relevant log in customer in the eSeller Cloud shop
Dependencies
Invoice Overview depends on the following
- An ERP Integration with an ERP system that supports the export of Invoices
- Log in customers
Setting up Invoice Overview
In order to setup Invoice Overview 3 main tasks must be completed; Setting up design for the Overview page, setting up design for the Invoice Details page and setting up ERP Integration.
Setting up Overview Design
Navigate to: Home >> Design >> Overall design >> Content Designer
Select “Customer related pages” from the drop down as shown in the image below.
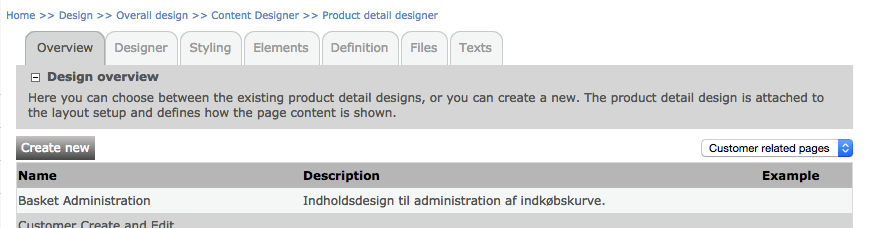
Click the “Create New” button to create a new content design
Enter “Invoice Overview” in the name field and click “Save”.
Edit the newly created content design by clicking the name “Invoice Overview”
Go to the “Definition” tab
Insert the Invoice Overview control by adding the following code:
<eSeller:Control ControlId="overview" ControlType="InvoiceOverview" />
Click “Save”
The final order of business is to create a page that uses the Invoice Overview content design.
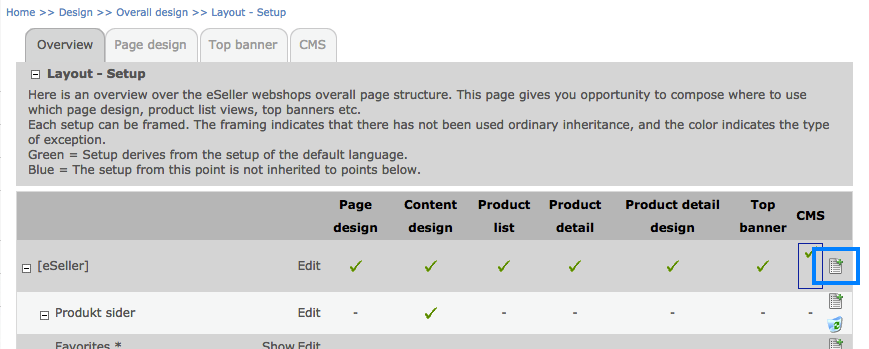
Navigate to Home >> Design >> Overall design >> Layout – Setup
Click the Add Page icon on the root node as show in the screenshot below.
Select “/customers/” in the “Folder name” drop down
Enter “Invoices” in the “Name” input field. The name and folder name options will constitute the path (e.g. /customers/Invoices.aspx)
Click “Save” to create the page.
Click “Edit” on the newly created page
Enter “Invoices” in the “Breadcrumb” field. This value is the string that will shown as breadcrumb in the shop
Select “Invoice Overview” from the Content Design “Setting” drop down.
Unselect the following options:
sIs visible when not logged in
Indexed by search engines
Click “Save”
You should now be able to validate the setup by logging into the shop as a login customer.
When logged in you should navigate to /customers/Invoices.aspx (the path must be entered in the address field of the browser since no menu link has been created yet) and validate that an empty table is shown. The table is empty because no invoices has been imported yet.
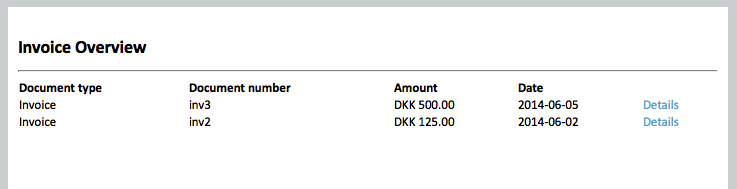
This is what the Invoice Overview page might look like:
Setting up Invoice Detail design
Navigate to: Home >> Design >> Overall design >> Content Designer
Select “Customer related pages” from the drop down as shown in the image below.
Click the “Create New” button to create a new content design
Enter “Invoice Overview” in the name field and click “Save”.
Edit the newly created content design by clicking the name “Invoice Details”
Go to the “Definition” tab
Insert the Invoice Detail data by adding the following code:
<eSeller:Data DataType="InvoiceHead" DataId="Invoice" />
<eSeller:Control ControlId="Details" ControlType="InvoiceDetails" DataSourceId="Invoice" />
<eSeller:Control ControlId="Totals" ControlType="InvoiceTotals" DataSourceId="Invoice" />

ExtID: <eSeller:Select Value-Of="Data_Invoice:ExtInvoiceID" /> <br />
Due date: <eSeller:Select Value-Of="Data_Invoice:DueDate" /> <br />
VAT number: <eSeller:Select Value-Of="Data_Invoice:VatNumber" /><br />
Sub total: <eSeller:Select Value-Of="Data_Invoice:SubTotal" /><br />
VAT amount: <eSeller:Select Value-Of="Data_Invoice:VatAmount" /><br />
Total inc. VAT: <eSeller:Select Value-Of="Data_Invoice:TotalWithVAT" /><br />
Payment terms: <eSeller:Select Value-Of="Data_Invoice:PaymentTerms" /><br />
Address: <eSeller:Select Value-Of="Data_Invoice:AddressName" /><br />
Line1: <eSeller:Select Value-Of="Data_Invoice:AddressLine1" /><br />
City: <eSeller:Select Value-Of="Data_Invoice:AddressCity" /><br />
ZIP code: <eSeller:Select Value-Of="Data_Invoice:AddressZipCode" /><br />
Country: <eSeller:Select Value-Of="Data_Invoice:AddressCountry" />
Click “Save”
The final order of business is to create a page that uses the Invoice Details content design.
Navigate to Home >> Design >> Overall design >> Layout – Setup
Click the Add Page icon on the root node as show in the screenshot below.
Select “/customers/” in the “Folder name” drop down
Enter “InvoiceDetails” in the “Name” input field. The name and folder name options will constitute the path (e.g. /customers/InvoiceDetails.aspx)
Click “Save” to create the page.
Click “Edit” on the newly created page
Enter “Invoice Details” in the “Breadcrumb” field. This value is the string that will shown as breadcrumb in the shop
Select “Invoice Details” from the Content Design “Setting” drop down.
Unselect the following options:
Is visible when not logged in
Indexed by search engines
Click “Save”
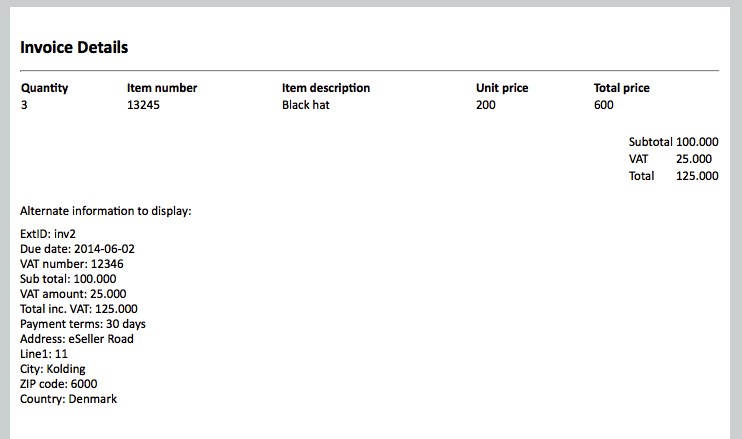
This is what the Invoice Details page might look like:
Setting up ERP Integration
Due to the many differences across business logic there is no single right way to integrate the Invoice Export from an ERP system. The Integration has to be done on a per-company basis in order to take company specific business logic into account. – Please contact your ERP consultant to setup Invoice Export for your ERP system.
For the sake of example, we will import a few simple invoices from a static xml file. If you plan on using the example file on your account it is important that you change the customer id on the invoices to reflect customers that exists on your account.
Download the InvoiceExample.xml example file.
Open file with a text editor (e.g. notepad, emacs or similar) and change the customerID node to a customer id that exists in your account.
Upload the file to the Imports folder using the method described in the “Manual Integration” section of How to integrate with your ERP system using Data Origin.
Note that it is important to use the Data Origin FTP login when performing integration.
When the upload is completed by the FTP client, you should validate in the eSeller Cloud administration that the upload is completed. Information about monitoring the progress and status of integrations is available here.
When the integration has been completed you should be able to log into the shop using the login of the customer specified in the customerID field. Once logged in you should see a list of invoices under the path /customers/Invoices.aspx.
Import Format
The Invoice import format is defined in the Import Schema available at:
Styling options
The InvoiceOverview and the InvoiceDetails control outputs table based HTML. The design can be styled and positioned freely according to any design.