This article describes order handling when using the QuickPay v10 payment system with special focus on orders for which the payment gateway callback is missing.
Contents
QuickPay v10 - Order handling
When a customer pays for an order using credit card, the payment gateway (e.g. QuickPay) handles the authorization of the credit card information and the payment. When the customer enters the payment gateway, enters his credit card information and accepts the purchase, the payment gateway verifies the payment information and sends a callback to the shop, telling it that the payment has been authorized and that the payment amount can be captured (Note that normally the amount is not captured until the order has been shipped).
Sometimes it may happen that a callback is not made to the shop in due time, meaning that the payment has not yet been authorized. Usually the authorization is made immediately and after this the order is marked as "ready". When an order is "ready" it means that:
- The payment has been authorized (the amount can be captured).
- The order can be exported from the shop.
- The order can be viewed in the order list in the shop administration.
- The stock levels of products in the order are updated.
- Any applied gift cards are redeemed.
- Any applied coupon codes are redeemed.
- An order confirmation e-mail is sent to the customer (and optionally to the shop administrator).
In turn, this entails that a missing payment authorization means that the actions above are not taken and thereby orders for which this happens may become “lost” – only visible in the payment system administrator where it is noted that the callback URL failed.
In order to overcome this problem in eSeller Cloud, orders for which the callback is missing will still be visible in the shop administration and the shop administrator will receive an e-mail notification saying that the order is missing the callback. This enables the shop administrator to react to such situations in a timely manner, for instance by contacting the customer if the order will be delayed. Note that this only applies for the QuickPay v10 payment system.
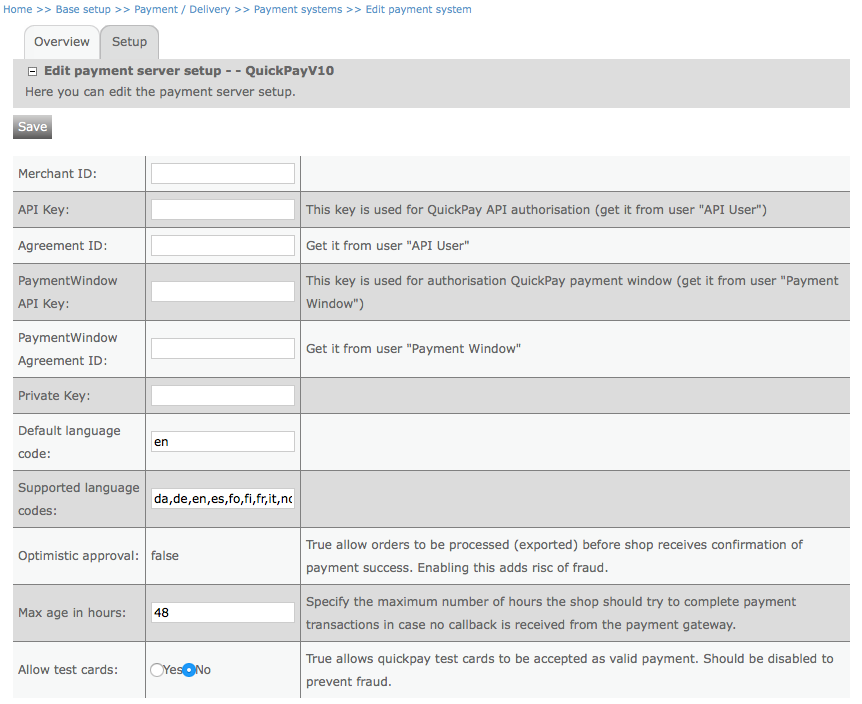
The QuickPayV10 payment system setup – at Base setup > Payment / Delivery > Payment systems > QuickPayV10. Currently enabling optimistic order approval is not supported.
On the payment system it is possible to specify whether payment with test cards are allowed. This option should ONLY be enabled in relation to testing and should be switched off afterwards. As long as this option is enabled, there is a significant risk of fraud.
What happens if the callback is missing for an order?
If the order is missing the callback from the payment gateway, orders are approved (but not "ready") when the payment information has been validated (credit card number, expiration date, CVV number etc.), but before the shop receives the transaction callback from the payment gateway, telling the shop that the payment has been authorized. For these orders the following rules apply:
- The customer does not receive an order confirmation e-mail until the payment has been authorized (the order is "ready").
- The shop administrator receives a “pending payment” e-mail notification (provided that a content design is selected in Base setup > Company info > Email addresses).
- The order cannot be exported until the payment has been authorized (the order is "ready").
- The stock levels of products in the order are not updated.
- Any applied gift cards are locked until the payment is authorized, which means that they cannot be redeemed on other orders until that time (or until they are manually unlocked using the gift card manager in the shop administration).
- Any applied coupon codes are not redeemed (meaning that they may be redeemed on other orders before the payment has been authorized)*.
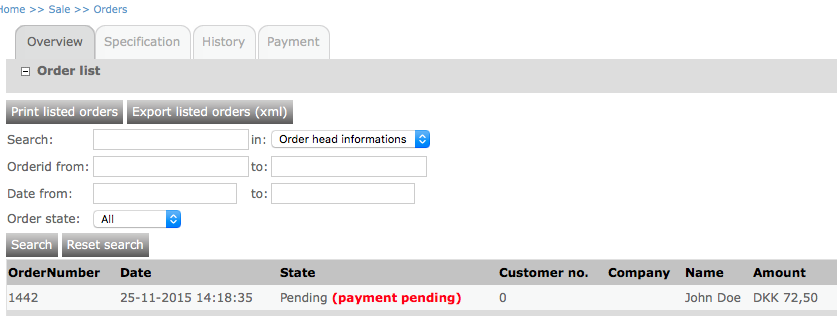
- The order is visible in the shop administration order list and has the status “Pending – (payment pending)”.
- When the customer returns from the payment gateway, he will be redirected to /basket/shoppingcart_step5.aspx (the order confirmation page) and the basket will be empty. Here it is suggested that the webdesigner implements a text telling the customer that the order has been created but that shop is awaiting the payment authorization and that he will receive an order confirmation e-mail as soon as this happen – for this purpose the runtime value “PaymentStatus”, which returns the value “pending” if the payment has not been authorized, will be helpful.
* If it happens that a “one-time” coupon code is redeemed on a different order before the order with missing payment authorization is made, the coupon code will be redeemed on both orders and on both orders, a line with the text “Invalid coupon. Code already used in different order.” is added to the order lines, making it possible to identify such cases. Note that the discount will still apply for both orders.
If your shop is using the QuickPay v10 payment system, the payment gateway will try to send a callback to the shop every hour for the first 24 hours. When the shop successfully receives the callback from the payment gateway, the order will become "ready", which means that the order confirmation e-mail will be sent to the customer, the stock levels will be updated, gift cards will be redeemed, the order can be exported etc.
Payment handling
If an order is missing the payment authorization and the payment system has optimistic order approval disabled, it will not be possible to handle the payment (e.g. capture or cancel) until the payment has been authorized. You will neither be able to manually handle the payment from the shop administration nor by importing payment commands via integration.
Setting up the shop to use QuickPay v10
Below you see the steps necessary for setting up QuickPay v10 on a shop.
1: Set up the payment system
Go to Base setup > Payment / delivery > Payment systems and select QuickPay v10. Specify the merchant information that you've received from your payment system provider.
2: Create one or more payment methods that uses the system
Go to Base setup > payment / delivery > payment methods and create one or more payment methods - make sure they use QuickPay v10 as the payment system.
3: Set up a content design to use for notification e-mails sent to the shop administrator in case an order is created without a callback
Go to Design > Overall design > Content designer > Select Basket and checkout option in the drop-down. Create a new content design that contains information relevant to the shop administrator in case the payment system fails to make the callback for an order - e.g. Order ID. See a simple example below:
<eSeller:Data DataType="OrderHead" DataId="Order" IsOrderEmail="True" />
<eSeller:Email Name="Subject">
	<eSeller:Select Text="email-subject" /> - <eSeller:Select Value-Of="Data_Order:OrderNumber" />
</eSeller:Email>

<p>The order with order number <eSeller:Select Value-Of="Data_Order:OrderNumber" /> was completed but is missing the transaction callback from the payment gateway.</p>
4: Set up the shop to use this content design in case an order is created without a callback
Go to Base setup > Company info > Email addresses and select the appropriate content design for the drop-down with the label "Design template for pending payment notifications". Note that it is only possible to select content designs that were created within the "Basket and checkout" section!
5: Set up the order confirmation page to display information to the customer if the callback fails
Using the runtime value "PaymentStatus" for orders it is possible to display special information to the customer in case the payment gateway fails to make the callback. This is useful because the customer should be made aware that the payment has not yet been authorized and that the customer will not receive the order confirmation e-mail until this happens. Below you see a simple example of how to use this runtime value:
<eSeller:If Test="Data_Order:PaymentStatus=&quot;pending&quot;">
	<p>We have received your order but the shop is awaiting some information about the payment.
	You will receive an order confirmation e-mail as soon as this is resolved. If you do not receive an order confirmation e-mail within a few hours, please contact us.</p>
</eSeller:If>
6: Ensure that integration is set up correctly
If the shop is integrated, orders are often exported using criteria files, where the orders are exported based on a time interval (CreatedBetween/CreatedSince). Because there might be a difference between when the order is approved and when the order is "ready" (actually created) this may have consequences for how these intervals need to be set.
When exporting orders using criteria files, the date used for filtering the orders is the date found in the <dateReady> element in Orders.xml. If your integration currently uses the date found in the <date> element (when the order is approved but not necessarily ready) to set the criteria time intervals, this may need to be changed - otherwise orders that are missing the callback might not be exported because of this distinction between dates. Please observe the example below.
A customer places an order with order number 1124 and reaches the order confirmation page at 14:05 (date approved). The payment gateway fails to send the callback and hence the order is only approved but not yet ready to be processed (e.g. exported).
The shop receives the callback for the order at 16:05 (now ready for processing, e.g. export).
The order has <date>YYYY-MM-DD 14:05:00</date> and <dateReady>YYYY-MM-DD 16:05:00</dateReady>
- A CreatedBetween criteria between 14:00 and 16:00 will not include order number 1124, because the order is not ready for processing until 16:05, where the callback is received.
- A CreatedBetween criteria between 16:00 and 18:00 will include order number 1124.
Payment fee
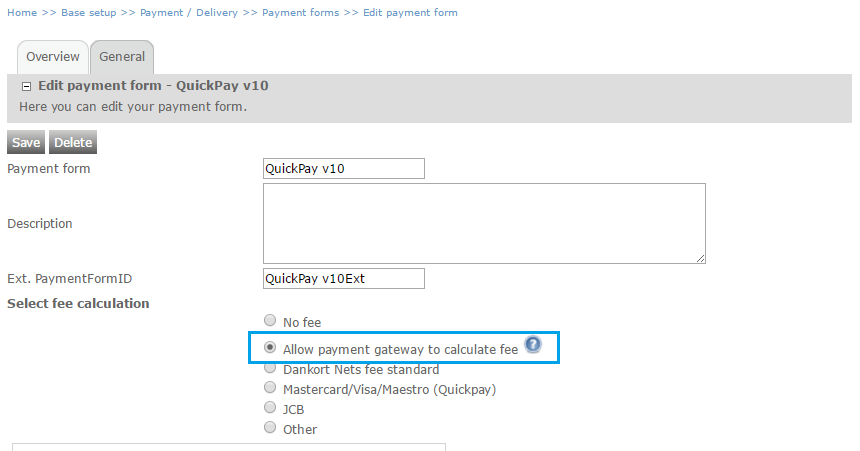
You can either specify a payment fee for a payment method directly in the shop administration, or you can allow QuickPay to calculate and add the payment fee to the order.
If you wish QuickPay to calculate and add the payment fee, you must select the option "Allow payment gateway to calculate fee" in the payment form setup in the shop administration.
The payment fee will not be calculated or added to the basket total in the shop - in the payment gateway it will be shown below the "Pay" button.
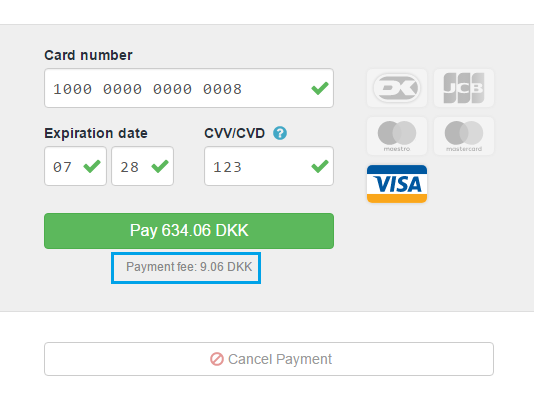
When the customer returns to the order confirmation page, the payment fee will be visible and will be included in the order total. Likewise, the payment fee will be visible in the order confirmation e-mail.
In order export the fee is specified in the <payment> segment.
Migrating from another payment system
If your shop is live and using a different payment system (e.g. an older QuickPay version), we strongly advise against changing the payment system of a payment method in use - it is very important that in stead you follow the steps below:
-
Create new payment method(s) using the new payment system (e.g. QuickPay v10) and keep the old payment methods. Do not delete the payment method(s) using the old payment system. Optionally, hide the old payment methods by using the "visible for login/non-login customers" settings.
- Make sure that the design is adapted to the newly created payment methods.
- (Optionally) Delete the old payment methods when you are sure that all payment commands have been executed (e.g. capturing, cancelling, refunding) for all orders paid using the old payment methods.
If the steps above are not followed (and in stead the payment system of an existing payment method is simply changed), the result may be that payments cannot be handled for orders created using the previous payment system. This means that you will not be able to capture payments for those orders!
Testing
QuickPay v10 offers support for testing the payment system using a variety of test cards. Payments using test cards will only be accepted if test cards are allowed on the payment system setup in the shop administration. If this setting is disabled, the callback from QuickPay will be rejected, ensuring that orders that are paid using test cards are not mistakenly processed and shipped. This means that any orders paid with a test card, while the payment system is set up not to allow test cards, will not be exported and it will not be possible to handle the payments (e.g. capture) from the shop administration (the orders will remain "approved" but not "ready").
If the payment system is set up to allow payments made with test cards, the payment will be authorized when the callback arrives as with a real credit card, and it will be possible to export the order, handle the payment, etc.
In the order history in the shop administration you are able to see if an order was paid using a test card.
If you wish to simulate a situation where the callback fails, you can do this by specifying expiration month 01 and expiration year 25 for any of the test credit cards. The callback will be rejected by the shop on the first attempt but will be accepted on following attempts where QuickPay re-sends the callback.
Subscription payments
QuickPay v10 supports recurring payments (subscription payments) - e.g. monthly payments.
The frequency with which amounts are drawn is not controlled by the shop; the shop will capture an amount when this is requested either by capturing from the shop administration or by importing payment commands.
You set up a subscription payment method simply by creating a payment method using the QuickPayV10 payment system and selecting the draw method "Subscription".

Orders with subscription payment are completed as any other order in the shop; in checkout the subscription payment method is selected.

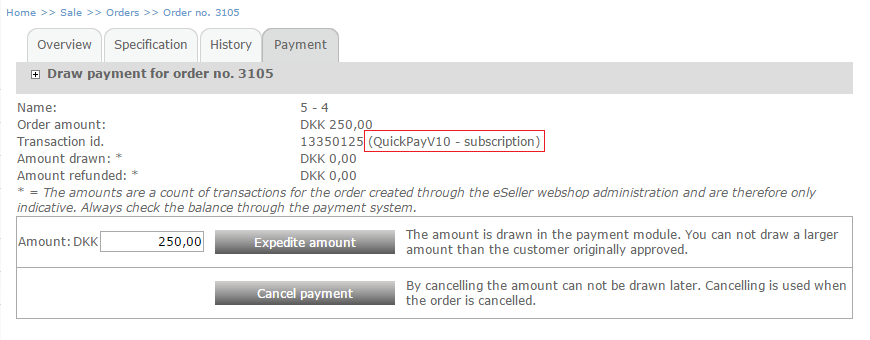
If orders use subscription payment, this is clearly visible from the order payment page in the shop administration.
Supported features
eSeller Cloud supports the following QuickPayV10 features.
Payment operations
- Authorize
- Recurring
- Capture
- Refund
- Cancel
Payment methods
- Card payment
- MobilePay
- ViaBill
Supported integration parameters
- version: The payment window version. The value is "v10".
- merchant_id: The Merchant Account ID.
- agreement_id: The User Agreement ID.
- order_id: The eSeller order number.
- amount: The order total in its smallest unit.
- language: Sets the language of the payment window user interface - follows the language of the shop, e.g. "da".
- currency: The currency as the 3-letter ISO 4217 alphabetical colde (e.g. DKK) - follows the currency of the shop.
- continueurl: The customer will be redirected to this URL upon a succesful payment.
- cancelurl: The customer will be redirected to this URL if the customer cancels the payment - "/basket/shoppingcart_step3.aspx".
- callbackurl: QuickPay will make a call back to this URL with the result of the payment.
- payment_methods: Lock to some payment method(s) - e.g. "visa,mobilepay". Is set up on the eSeller payment form under "Limit to card types".
- type: Type of transaction - payment or subscription.
- description: Used by subscription payments.
- autofee: Determines whether the payment window calculates payment fee. Is set up on the eSeller payment form - select "Allow payment gateway to calculate fee".