The offers functionality enables you to create tailored offers for your webshop customers. By creating an offer you are able to specify special prices on one or more products and send the offer directly to your customer in an e-mail - complete with offer details and a link to the webshop basket which is already filled with the products in the offer - ready to purchase. Note that offers are not compatible with variant products.
Offer overview
From the offer overview (Sale > Offers) you are able to see a complete overview of all offers that have been created, sent, cancelled and accepted. You are able to filter the overview by selecting a date range or selecting which types of order statuses you wish to see (f. inst. “Accepted”). You are also able to search for a particular offer using the search field.
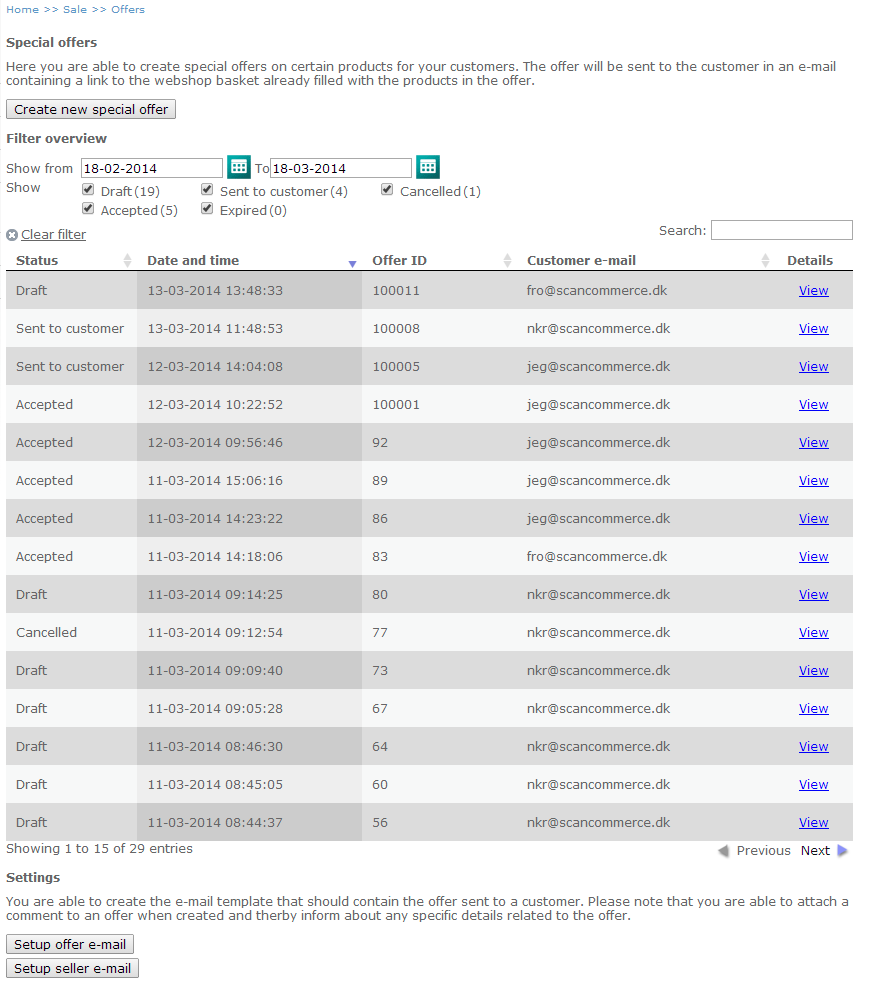
Overview of all offers
You are able to see details about offers by clicking “View”. A popup appears from where it is possible to copy the offer, edit the offer, (re)send the offer or cancel the offer.
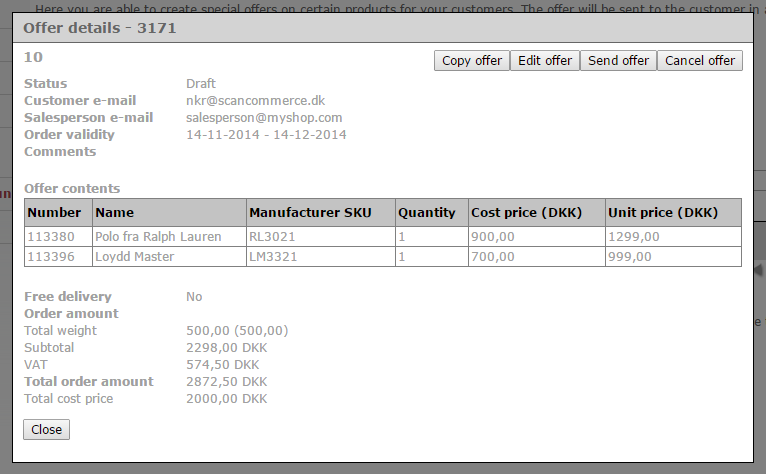
View offer details
Creating a new offer
To set up a new offer navigate to Sales > Offers.
Click “Create new special offer”
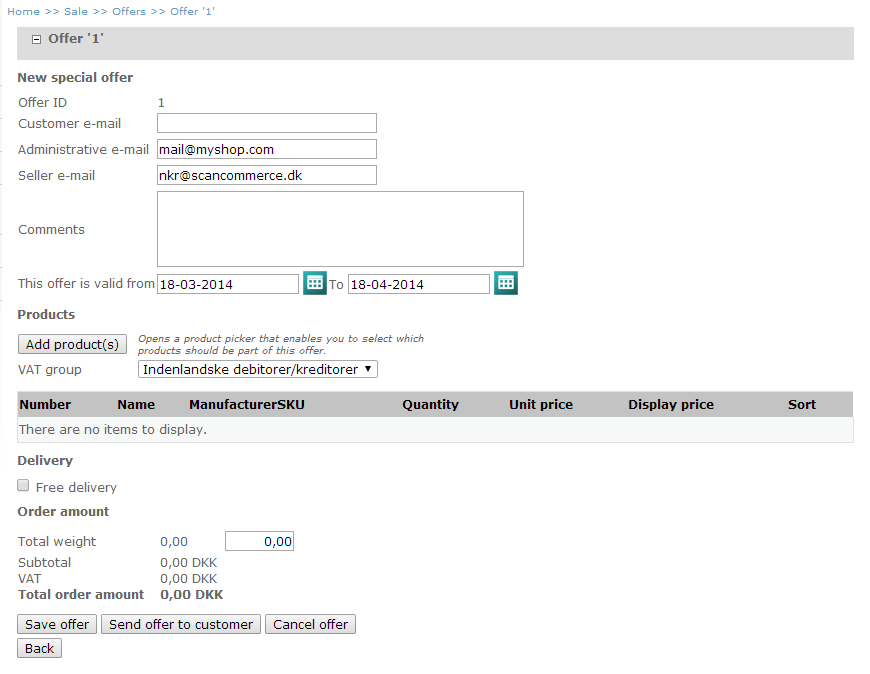
Creating a new offer
Fill in the following details:
Customer e-mail: Enter the e-mail address of the customer. This is the e-mail to which the offer will be sent.
Administrative e-mail: The administrative e-mail is the official e-mail from your company; the e-mail of the webshop. A copy of the offer e-mail will be sent to this address when it is sent to the customer.
Seller e-mail: This is the e-mail of the seller creating the offer. This field will be pre-filled with the e-mail of the profile that is logged in to eSeller Cloud shop administration. An e-mail will be sent to this address when the customer has accepted the offer.
Comments (Optional): It is possible to enter a comment from the seller. If supported by the offer e-mail, the comment will be displayed in the offer e-mail by use of the [Remarks] short code.
This offer is valid to/from: Specify the time period in which the offer is valid.
VAT group: Select the customer VAT group that should apply to this offer.
Please note that the offer is automatically assigned a numeric ID (Offer ID).
Adding Products to the offer
In order to add products to the offer, click the “Add product(s)” button. This button opens a product picker where all products in the shop are displayed. You are able to search products using the search field or you can select to display products from a certain product menu.
Check the boxes of the products you wish to add to the offer and click “Save”.
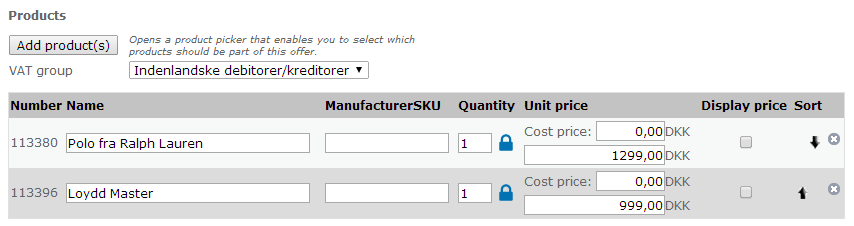
Products added to the offer
Now the selected products are added to the offer and appear in a table. Product name, manufacturer SKU, cost price and unit price are all filled if the data exists on the product. However, you are able to change/specify information about the products directly in the offer before it is sent to the customer – just change the contents of the text fields. Information that is specified in the offer will be what appears in the offer e-mail as well as in the basket and ERP system for integrated shops – for instance if the item name or unit price has been changed in the offer.
Below is a specification on the different fields applied to products in the offer.
Name: The name of the product.
Manufacturer SKU: A unique ID specified by the manufacturer of the product – this field will be empty if the manufacturer SKU has not been specified on the product master data. However it can be filled in the offer if necessary.
Quantity: You are able to specify the quantity of the product in the offer. If the blue padlock is locked, this means that the customer is not able to change the quantity (neither increase nor decrease) of the product when the offer is viewed in the shop basket.
You can change this setting by clicking the blue padlock – a popup appears allowing you to unlock the quantity (by removing the checkmark in the “Quantity locked” checkbox) and specify a minimum quantity. This means that the customer will be able to increase the quantity of the product in the basket, but not decrease it below this minimum quantity.
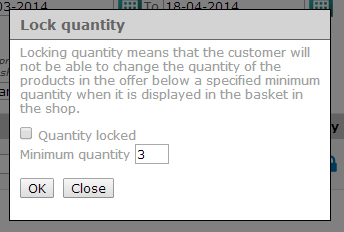
Lock/Unlock quantity on a product in the offer
Unit price: Specify the unit price of the product (without VAT).
Cost price: This is the cost price of the product. If no cost price is applied to the product master data, this field will be empty. Please note that the cost price will not appear in the offer – this information is visible in shop admin for reference only.
Display price: You are able to specify whether or not the customer should be able to see the unit price of each of the products in the offer. If the unit price of the products is not visible to the customer, only the total price will be visible.
Sort: Arrange the products in the order you want them to appear in the offer by clicking the up/down arrows.
Delivery
If the checkbox “Free delivery” is checked, the weight of the offer will not be added to the basket order weight for weight differentiated delivery fees.
If your webshop has weight-differentiated delivery fee calculation or Consigner delivery fee calculation integration, you can specify the total weight of the order (in grams), and thereby the delivery fee will be calculated on the basis of this total order weight.
Offers do not support calculating prices using manufacturer specific delivery fees.
If you wish to send the offer to the customer right away, click the “Send to customer” button. The offer will be sent to the customer e-mail (and a copy to the admin e-mail). The status of the offer will be “Sent to customer” – the offer will also automatically be saved. If you wish to save the offer without sending it, click “Save” offer. Then the offer will appear in the offer overview where the status will be “Draft”. You are always able to send the offer later by clicking “View” and then “Send offer” in the popup that appears.
Editing an offer
Let’s say an offer has been sent to a customer who has responded that he would like to accept the offer if the price on one of the products in the offer is lowered, meaning that you now wish to edit the offer. This is done in a few easy steps:
Locate the offer in the offer overview – click “View”.
Click “Edit offer” in the popup.
Now you see the offer and you are able to change it.
Remember to send the offer to the customer again by clicking “Send offer to customer” as the link in the previous offer e-mail will no longer be valid.
Cancelling an offer
If you wish to cancel an offer – meaning that the link in the offer e-mail is no longer valid, this is also easily done in a few steps:
Locate the offer in the offer overview – click “View”.
Click “Cancel offer” in the popup.
Now the offer is no longer valid. The offer will remain in the offer overview; however the status will change to “Cancelled”.
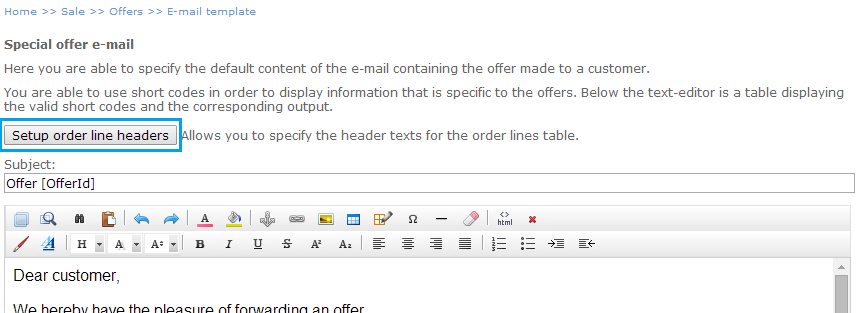
Setting up e-mail contents
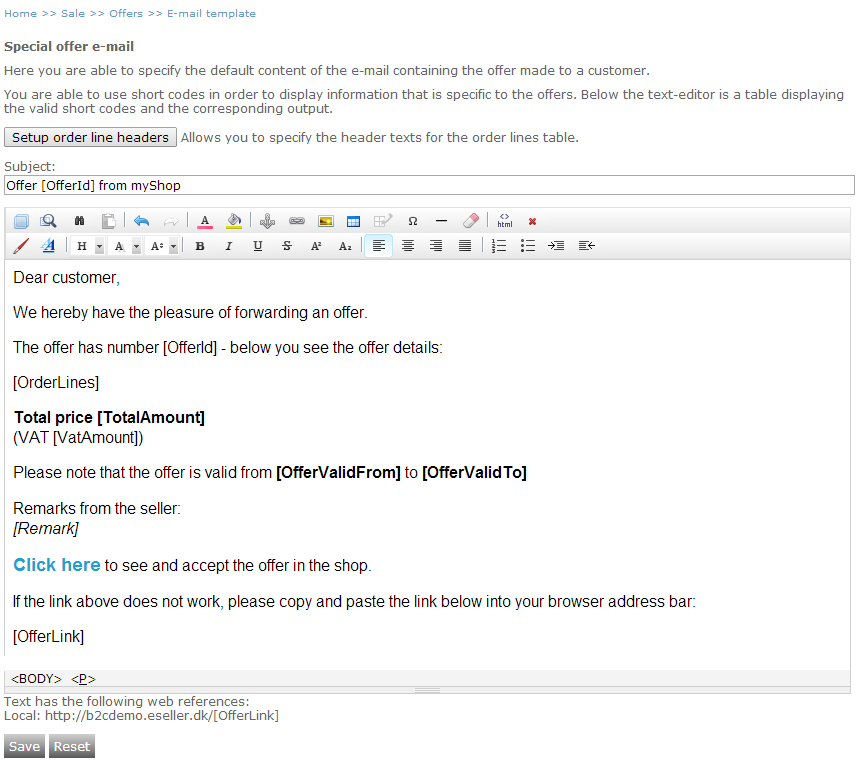
You are able to specify the offer e-mail that is sent to the customer. This is done from Sale > Offers and click the “Setup offer e-mail” button.
Setup offer e-mail
The e-mail is set up in a rich text editor where you are able to style the look of the e-mail either by using the built-in text formatting components or by using HTML/CSS (click HTML button).

Text editor HTML button
In the e-mail you are able to use dynamic values such as the Offer ID – values that are specific to each offer. These dynamic values are added as short codes – for instance [OfferID] which will output the ID (number) of the offer.
Below the text editor appears a table displaying all available short codes as well as what they output. Below you see an example of what the used short codes will output in the e-mail.
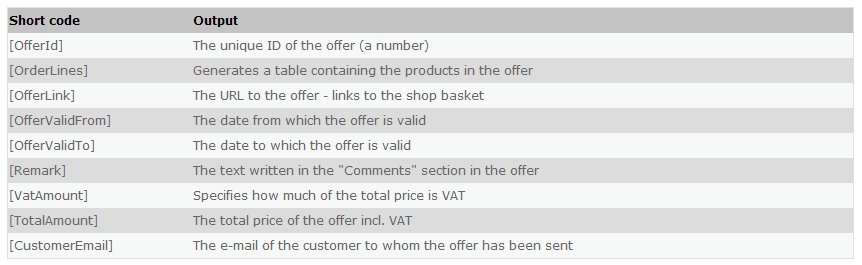
Short codes
Below is an example of what an e-mail template will generate in the offer e-mail.
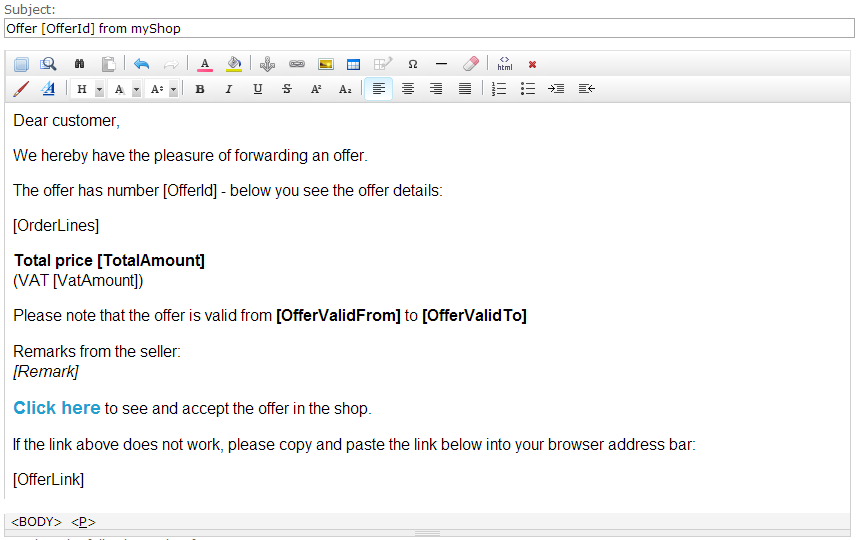
E-mail template
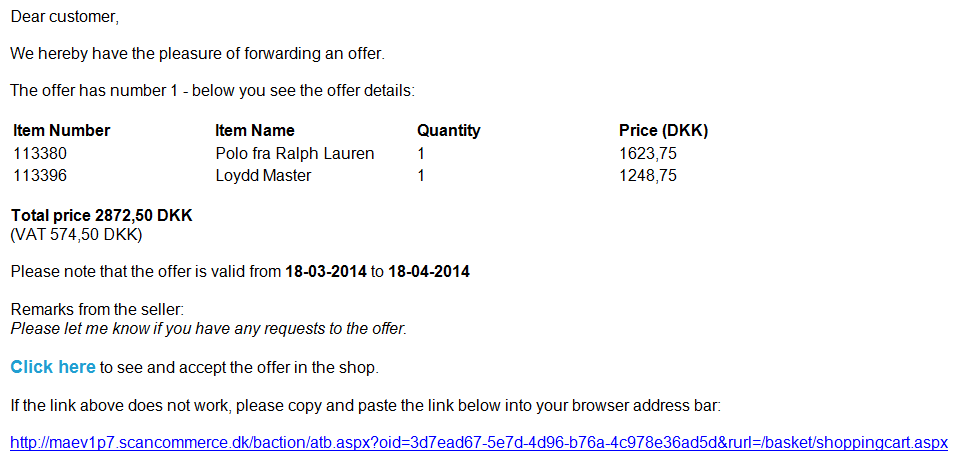
Actual e-mail generated by the template.
Note that the product unit prices in the offer are including VAT
You are also able to specify the e-mail that is sent to the seller when a customer accepts an offer that the seller has created. This is done in Sale > Offers and then clicking the “Setup seller e-mail” button. As with the customer offer e-mail a rich text editor lets you specify and style the contents of the e-mail using the short codes displayed in the table below the editor.
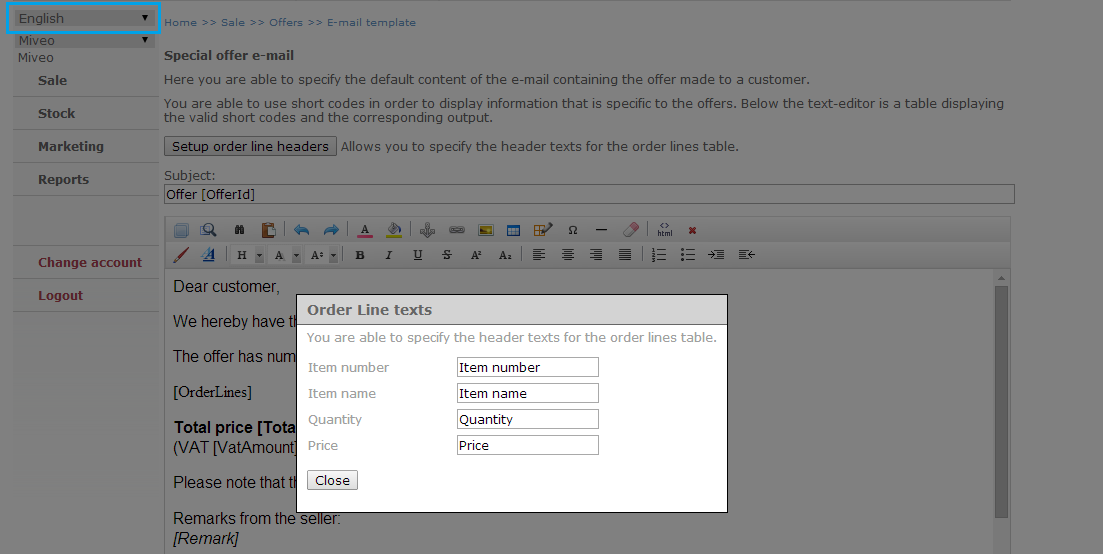
Changing the order line headers
You are able to change and add translations to the order line headers (item number, item name, quantity and price). This is done by clicking the "Setup order line headers" above the text editor.
For each of the order line headers, you can specify the text you wish. Click Close and remember to save. If you wish to add a translation, select the desired language in the language selector dropdown to the left in shopadmin and then click the "Setup order line headers" button - click Close and Save when finished.
Accepting the offer
When the customer receives the offer e-mail, he/she can click the link and will be directed to the shop with the items in the offer already filled in the basket. Once an offer is accepted, the link will become invalid so that the same offer cannot be accepted more than once. For fraud prevention reasons an offer is accepted (no longer valid) when the customer proceeds to the payment gateway. This means that if the customer goes to the payment gateway and cancels the payment (is redirected back to the shop), the offer is no longer valid and a new must be created.
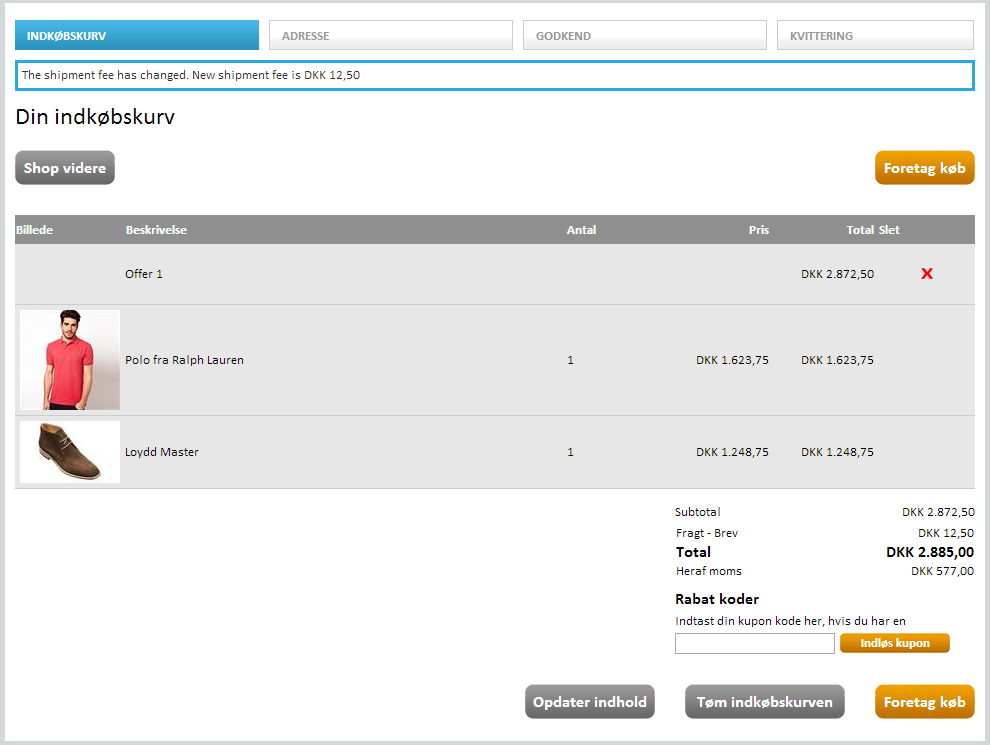
Offer viewed in the shop basket