Custom fields are a powerful tool for enriching your products with data that can be used for filtering, displaying specialized product lists (in conjunction with the JSON product list) or displaying a rich body of information about your products on the product detail page.
By using custom fields you are able to apply specifications to your products that are not native to the product handling in the shop administration. A few examples are Screen size, PEGI rating, length, material, country of origin, etc. – virtually any information you wish to add to your product.
Custom fields are essentially names and values. The custom field with the name “Material” may on one product have the value “Cotton” , on another product have the value “Polyester” and on a third product have the value “Wool”. On the product detail page you can display this information about the products by using runtime values.
Moreover, you can create a product filter (named Material) which enables the customer to find only products with the custom field value “Cotton” – meaning all products of the material “Cotton”.
Note that the following rules apply when using custom fields:
- A custom field can only have one value on a particular product. This means that the same product cannot have the custom field “Material” with values “Cotton” and “Wool” (by applying the same custom field twice and specifying different values).
- A custom field can be used on many products (zero or more).
- A product can have many custom fields associated (zero or more).
Creating and activating custom fields – Shop Administration
Applying custom fields from the Shop Administration can be done in a few easy steps:
-
Create a custom field
-
Navigate to a product
-
Activate the custom field on the product and provide an appropriate value
Create a custom field
In order to create a new custom field go to Stock > Custom fields. Here you see an overview of any custom fields in your shop. Both custom fields created in the shop administration and imported through a Data Origin appear here.
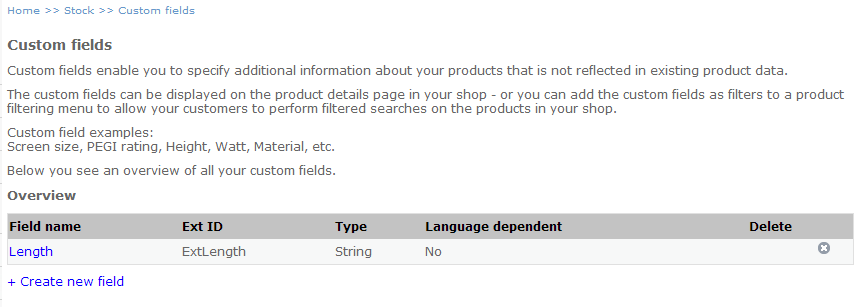
Click “Create new field”
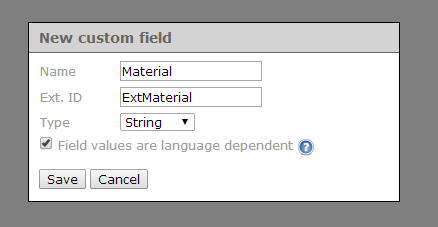
Name the custom field and provide an external ID. Note that the name you select here will also be the product filter name if the custom field is to be used as a product filter.
Select the appropriate data type for the custom field – this is the data type of the custom field value. Currently the data types String, Integer, Decimal and “Custom” are supported.
Select whether the custom field value(s) should be localizable – that is whether it should be possible to provide translations of the values for different languages.
Click “Save”
If you ever wish to edit the custom field, simply click it from the custom list overview. To delete a custom field, click the delete-icon. If you delete a custom field, any relations to products or product filters will also be removed.
Note that custom fields that have been imported via a Data Origin cannot be deleted or edited in the shop administration. Also, you cannot change the localization setting or data type of a custom field while the custom field is active on one or more products.
TIP: If you wish to provide translations for the custom field name simply change the language in the shop administration (drop-down in the left panel), click the custom field for which you wish to apply the translation, enter the desired translation as the custom field name and click “save”. Now from the overview you see that the custom field name changes when changing the language in the drop-down.
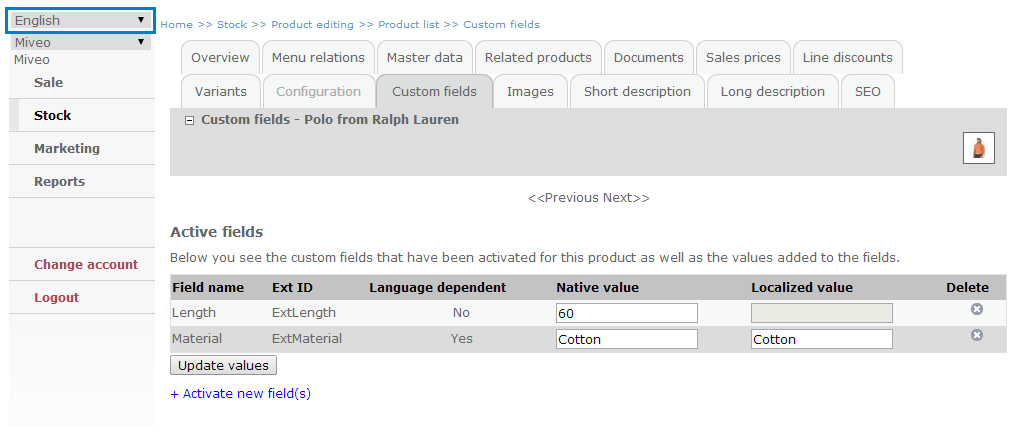
Activate the custom field on a product
Navigate to a product in your shop via Stock > Product Editing > Product list and select a product in the list.
Click the “Custom fields” tab
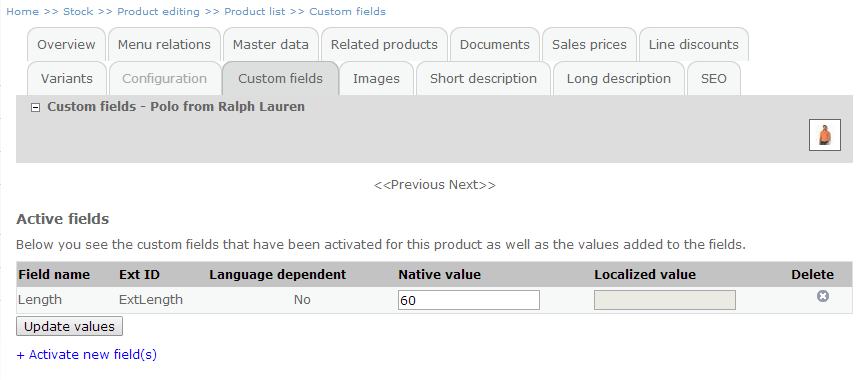
Click “Activate new field(s)”

Select one or more custom fields by checking the boxes.
Click “Save”
Apply the appropriate values. If the custom field is language dependent, you must specify both a native value as well as a localized value. If the custom field is not language dependent, you will only be able to specify a native value. By changing the language in the shop administration (drop-down in the panel to the left) you are able to specify translations for the custom field by entering the translation in the “Localized Value” field.
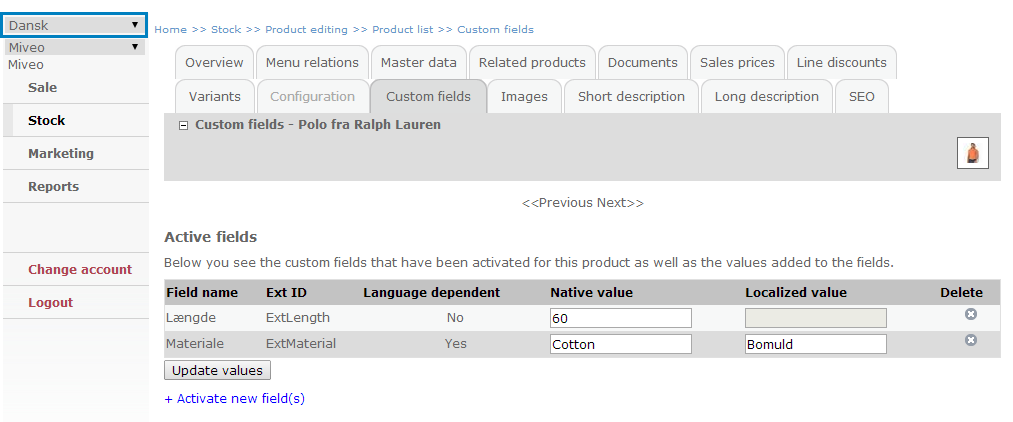
Danish translation of custom field
English translation of custom field
Click “Update values” when you are done.
Note that custom fields created via a Data Origin cannot be activated on a product through the shop administration. Likewise, you cannot change the custom field value of a custom field activated via a Data Origin.
Creating and activating custom fields – XML import
You are able to import custom fields via FTP – for example from a Data Origin. Below is an example and explanation of how to incorporate custom fields in the import XML file. Also, you can consult the XML Schema documentation for more information.
Example
Below is an example of how to define custom fields and associate these custom fields to a product in the XML file.
Define custom fields
<integrationData>
[…]
	<productCustomFieldDefinitions>
		<productCustomFieldDefinition id=”material”>
			<type>String</type>
			<areValuesLocalizable>true</areValuesLocalizable>
			<localizedName>
				<languageId>DAN</languageId>
				<name>Materiale</name>
			</localizedName>
			<localizedName>
				<languageId>ENG</languageId>
				<name>Material</name>
			</localizedName>
		</productCustomFieldDefinition>
		<productCustomFieldDefinition id=”length”>
			<type>Integer</type>
			<areValuesLocalizable>false</areValuesLocalizable>
			<localizedName>
				<languageId>DAN</languageId>
				<name>Længde</name>
			</localizedName>
			<localizedName>
				<languageId>ENG</languageId>
				<name>Length</name>
			</localizedName>
		</productCustomFieldDefinition>
	</productCustomFieldDefinitions>
[…]
</integrationData>
Associate custom fields and product
<product id=”…”>
[…]
<customFields>
	<customField id=”material”>
		<nativeValue> Cotton </nativeValue>
		<localizedValue>
			<languageId>DAN</languageId>
			<value>Bomuld</value>
		</localizedValue>
		<localizedValue>
			<languageId>ENG</languageId>
			<value>Cotton</value>
		</localizedValue>
	</customField>
	<customField id=”length”>
		<nativeValue> 172 </nativeValue>
	</customField>
</customFields>
[…]
</product>
Explanation
As part of the <integrationData> section, you must define the custom field(s) within a <productCustomFieldDefinitions> section:
- Type: The data type of the custom field value(s). Currently the data types String, Integer, Decimal and “Custom” are supported.
- Are values localizable: A Boolean specifying whether the custom field values should have translations. If false, you are not able to specify translations for custom field values – only a native value is accepted. If true, you must specify translations for custom field values using the <localizedValue> element in the specification of the custom field on the product. Often the <areValuesLocalizable> property will be true for String values and false for numeric values.
- Localized name: A string specifying a localized name for the custom field. Note that this custom field name will be the name of the filter, if the custom field is used as a filter.
As part of a <product> section, you must associate the custom field(s) within a <customFields> section:
- Native value: The un-localized value of the custom field. If “areValuesLocalizable” is set to false in the product custom field definition, only this element should be present in specifying the custom field on the product. Note that this field may contain maximum 50 characters.
- Localized value: The localized (translated) value of the custom field. If “areValuesLocalizable” is set to true in the product custom field definition, both the <nativeValue> element and this element must be present in specifying the custom field on the product.
- Language ID: The ID of the language
- Value: The (localized) value of the custom field (the translation). Max 1000 characters.
Using custom fields as product filters
Custom fields seamlessly integrate to the product filters functionality making it quick and easy to create product filters based on custom fields in only a few steps. Custom fields enable you to create filters based on properties such as length, PEGI rating, material, screen size etc.
To do so, follow the documentation on Product Filters.
Displaying custom field values on the product detail page
In order to display the custom fields on the product detail page you need to extract the custom field values (and/or names) and place them somewhere in the content design of the product detail page.
Navigate to the content design of the product detail page: Design > Overall design > Content designer and select the appropriate content design.
Click the “Definition” tab
Place the following code where you wish to display the custom field name (e.g. “Material”):
<eSeller:Select Value-Of="Context:CustomFieldNames.CUSTOMFIELDEXTID" />
- where CUSTOMFIELDEXTID is the external ID of the custom field for which you wish to display the name.
Place the following code where you wish to display the custom field value (e.g. “Cotton”):
<Seller:Select Value-Of="Product:CustomFields.CUSTOMFIELDEXTID" />
- where CUSTOMFIELDEXTID is the external ID of the custom field for which you wish to display the value.

Displaying Custom Field name and value on a product detail page.