eSeller Cloud supports integration with virtually any ERP system that is able to provide data in XML format or in a format that can be transformed to a valid XML document. Some ERP systems are able to export data as XML, however in order for this XML-formatted data to integrate to eSeller Cloud, it is necessary that it conforms to the standards of the XML Schema that eSeller Cloud uses. Likewise, if you wish to import data from eSeller Cloud to your ERP system, the data format must conform to the standards of your ERP system.
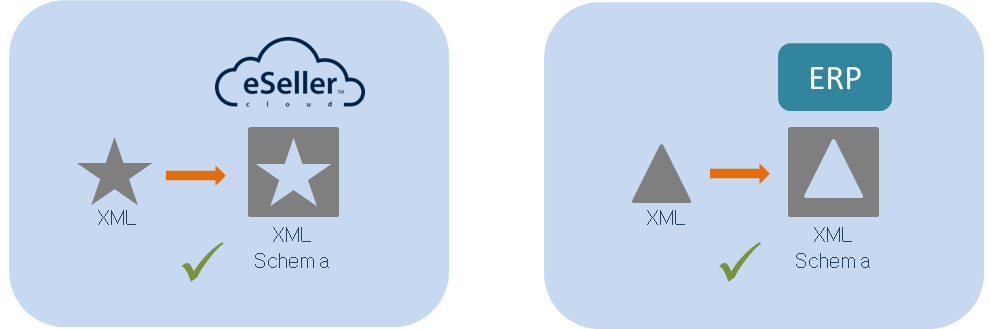
The diagrams above illustrate that eSeller Cloud has a distinct XML Schema (represented by a star shaped cutout) that only accepts XML data formatted to fit in this schema. Likewise, your ERP system (provided that your ERP system is able to import data formatted as XML) has a distinct XML Schema (represented by a triangular shaped cutout) that only accepts XML data formatted to conform to this schema.
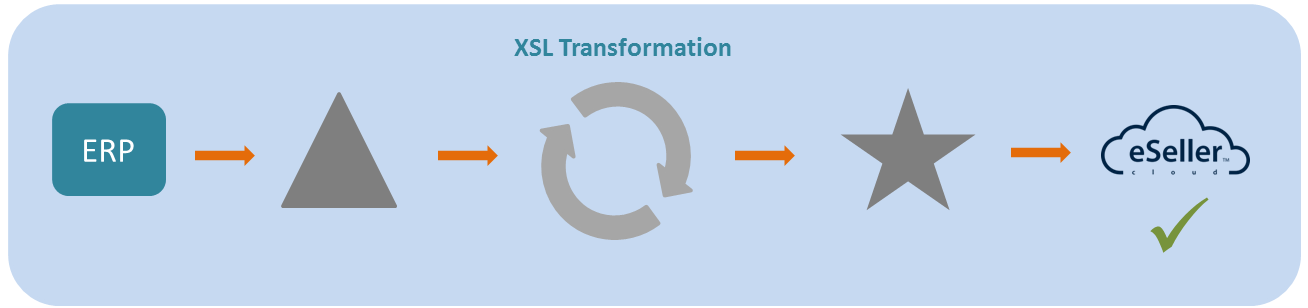
The diagram above illustrates XML data coming from your ERP system in a particular format, which is then transformed to the appropriate format that eSeller Cloud accepts before it is successfully imported to eSeller Cloud.
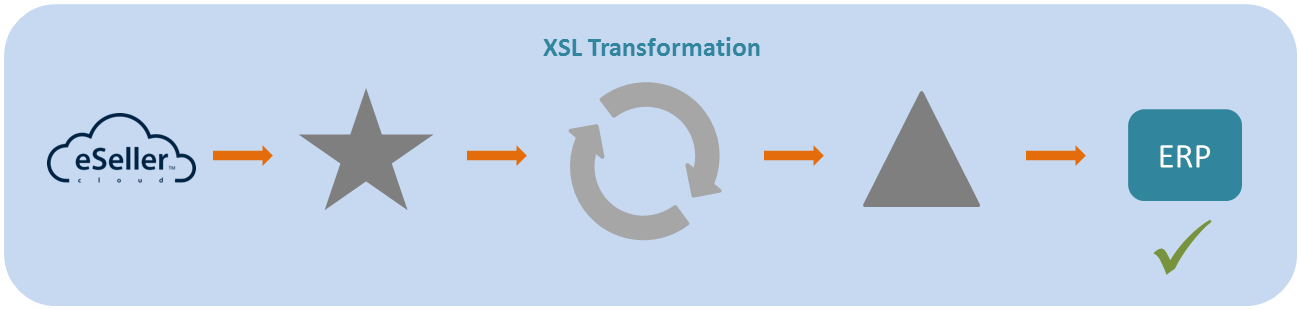
Similarly, the diagram above illustrates data coming from eSeller Cloud which is then transformed to a format that the ERP system accepts.
If you are using the eSeller Kit for Navision as your ERP system, the XML data exported from Navision is already in the correct format and will integrate to eSeller Cloud without the need for transformation. However, as Navision has strict rules to how XML documents should be structured in order to handle import to Navision, you need to use an XSL document for each type of eSeller Cloud export; Order export, Payment export and Customer export. When the eSeller Cloud shop administration is provided with the appropriate XSL files, it will automatically transform the exported XML documents coming from eSeller Cloud to the correct standard accepted by Navision.
We strongly recommend that all integrated shops use XSL files for exports to the ERP system. This is crucial as the eSeller Cloud integration regularly gets updated, which means that new fields may be added to the export, which the ERP system might not support, and hence the integration may break. By applying XSL files it is ensured that the format exported to the ERP system remains the same and that any new fields in the export are filtered out.
Uploading XSL files
In order to do this, go to Base setup > Company info > Account > Integration tab and select the Data origin that your Navision integration uses.

Click “Manage XSLT files”

Now you are able to upload an XSL file for each type of integration task. As mentioned, you only have to provide the data origin with export XSL files if you are using the Navision eSeller Kit as your ERP system.
Select the appropriate file for Order export, Customer export and Payment export. Do not upload anything for Import.
Click “Save”
Now, every time you export data from eSeller Cloud, it will be transformed using the XSL files so that it conforms to the XML Schema of Navision and thereby can be imported to Navision.
Sometimes the XML exported from eSeller Cloud might change (new sections might be added) which means that in order for the integration to include these new sections, an updated XSL file must be uploaded. Up-to-date XSL files are available under Resources at the bottom of this page. Please note that these XSL files will only apply to the eSeller kit for Navision.
Customer Lifetime ID's
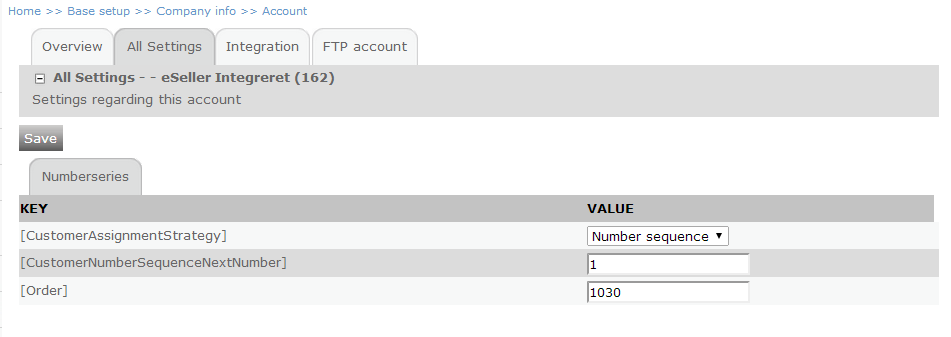
All customers created in eSeller Cloud are provided with a Lifetime ID - this is a unique identifier that remains the same throughout the lifetime of the entity. Per default this Lifetime ID is created as a unique string containing both numbers and letters - but as Navision requires that these Lifetime ID's must be integers, it is necessary to change how the Lifetime ID's are created in the shop administration in order to successfully export customers from eSeller Cloud to Navision. This can be done by accessing Base setup > Company info > Account and selecting the All Settings tab. In the [CustomerAssignmentStrategy] change the value of the drop-down to "Number sequence". Now eSeller Cloud is ready for import and export using the eSeller kit for Navision.
Using XSLT with other ERP systems
If you are using an ERP system other than Navision that is able to either export data as XML or as a format that can be converted to XML, you are also able to use XSL files to transform XML to conform to the XML schema of both your ERP system and eSeller Cloud. Under Resources, you are able to find XML Schema files (XSD) as well as documentation on the Schemas, that you can use to create your own XSL files for integrating data between eSeller Cloud and your ERP system. If you are using an ERP system other than Navision, you have to upload XSL files for all integration job types – including Import.
You are able to validate your XSL file in order to verify that it conforms to the XML schema of eSeller Cloud. Open your FTP client and enter ftp.esellercloud.com as the host. Use your Data Origin credentials to access the FTP folder. To the “Import” folder, upload an XML file you have exported from your ERP system along with the XSL file that you have created. If the import succeeds, the XSL file is valid, and you can upload the XSL file to the data origin in the shop administration. If the import fails, your XSL file is invalid and needs to be changed.
In the same way, you are able to test the XSL files for exports; Upload your XSL file and download the file you wish to export - In that way the XML file will be transformed using the XSL file before it is downloaded, and you will be able to see whether your XSL file transforms the XML file correctly according to your ERP system.
Please note that using this method for testing has certain requirements for the XSL file names: the XSL file for import must be named import.xsl, the XSL file for order export must be orders.xsl, the XSL file for customer export must be customers.xsl and the XSL file for payment export must be named paymentTransactions.xsl.
Furthermore, when uploading XSL files via FTP, they are only valid for the session and will be deleted when the session expires. Therefore this approach to using XSL files is only suitable for testing. When you have created the XSL files that you wish to use in integration, they should be uploaded in the shop administration as shown previously.
XSL files
-
XSL files Version 2.5 EGVAR
Suitable for eSeller Cloud EG variant solutions.
This version is identical to "XSL files Version 2.5", except for the following:
- The encoded value of basket user values (files) is excluded from order export.
-
XSL files Version 2.5
This version contains the following changes:
Order export:
- priceListId, isInventoryCheckSuspended and priceCalculationDate included for order head
- deliveryAddressId included for delivery address
- userCode1, userCode2, userCode3, tag, deliveryDate and priceCalculationDate included for order line.
- XSL files Version 2.4
This version contains the following changes:
Gift card export:
- shopGroupId included for transactions
- transactionId included for transactions
Customer export:
- shopGroupId is now transformed properly according to the schema
- mobilePhoneNo included
- fixed a problem where the <customers> element was repeated per customer.
Order export:
- posId included in order lines
- isAmountInTotals included in order lines
- isSumLine included in order lines
- XSL files Version 2.3
Added support for the field <dateReady> in order export and <transactionId> in payment transactions.
- XSL files Version 2.2 Contains XSL file for gift card export + added support for the following fields on order export:
- posId, barcode, locationId and userValues (only if not empty) on <order> element
- productVatGroupId on <payment> element
- productVatGroupId on <shipment> element
- barcode on <parcelCollect> element
- giftCardCodes on <line> element (only if not empty)
- new <userValues> segment containing any user values on the order
- only one <placedOrders> element.
- XSL files Version 2.1 Added support for Parcel Collect, manufacturer SKU and cost price on order export.
- XSL files Version 2.0
XML Schemas
Schema file documentation